In this tutorial, we’ll build a Blog application with Django that allows users to create, edit, and delete posts. The homepage will list all blog posts, and there will be a dedicated detail page for each individual post. Django is capable of making more advanced stuff but making a blog is an excellent first step to get a good grasp over the framework. The purpose of this chapter is to get a general idea about the working of Django.
Here is a sneak peek of what we are going to make.

Before kicking off, I hope you already have a brief idea about the framework we are going to use for this project if not then read the following article: Django – Web Framework For Perfectionists.
Pre-Requirements
Django is an open-source web framework, written in Python, that follows the model-view-template architectural pattern. So Python is needed to be installed in your machine. Unfortunately, there was a significant update to Python several years ago that created a big split between Python versions namely Python 2 the legacy version and Python 3 the version in active development.
Since Python 3 is the current version in active development and addressed as the future of Python, Django rolled out a significant update, and now all the releases after Django 2.0 are only compatible with Python 3.x. Therefore this tutorial is strictly for Python 3.x. Make sure you have Python 3 installed on your machine if not follow the below guides.
Windows Users
Mac And Unix Users
Creating And Activating A Virtual Environment
While building python projects, it's a good practice to work in virtual environments to keep your project, and it's dependency isolated on your machine. There is an entire article on the importance of virtual environments Check it out here: How To A Create Virtual Environment for Python
Windows Users
cd Desktop
virtualenv django
cd django
Scripts\activate.bat
Mac and Unix Users
mkdir django
cd django
python3 -m venv django
source django/bin/activate
Now you should see (django) prefixed in your terminal, which indicates that the virtual environment is successfully activated, if not then go through the guide again.
Installing Django In The Virtual Environment
If you have already installed Django, you can skip this section and jump straight to the Setting up the project section. To Install Django on your virtual environment run the below command
pip install DjangoThis will install the latest version of Django in our virtual environment. To know more about Django installation read: How To Install Django
Note - You must install a version of Django greater than 2.0
Setting Up The Project
In your workspace create a directory called mysite and navigate into it.
cd Desktop
mkdir mysite
cd mysite
Now run the following command in your shell to create a Django project.
django-admin startproject mysiteThis will generate a project structure with several directories and python scripts.
├── mysite
│   ├── __init__.py
│   ├── settings.py
│   ├── urls.py
│   ├── wsgi.py
├── manage.py
To know more about the function of the files read: Starting A Django Project
Next, we need the create a Django application called blog. A Django application exists to perform a particular task. You need to create specific applications that are responsible for providing your site desired functionalities.
Navigate into the outer directory where manage.py script exists and run the below command.
cd mysite
python manage.py startapp blog
These will create an app named blog in our project.
├── db.sqlite3
├── mysite
│   ├── __init__.py
│   ├── settings.py
│   ├── urls.py
│   ├── wsgi.py
├── manage.py
└── blog
    ├── __init__.py
    ├── admin.py
    ├── apps.py
    ├── migrations
    │   └── __init__.py
    ├── models.py
    ├── tests.py
    └── views.py
Now we need to inform Django that a new application has been created, open your settings.py file and scroll to the installed apps section, which should have some already installed apps.
INSTALLED_APPS = [
    'django.contrib.admin',
    'django.contrib.auth',
    'django.contrib.contenttypes',
    'django.contrib.sessions',
    'django.contrib.messages',
    'django.contrib.staticfiles',
]
Now add the newly created app blog at the bottom and save it.
INSTALLED_APPS = [
    'django.contrib.admin',
    'django.contrib.auth',
    'django.contrib.contenttypes',
    'django.contrib.sessions',
    'django.contrib.messages',
    'django.contrib.staticfiles',
    'blog'
]
Next, make migrations.
python manage.py migrateThis will apply all the unapplied migrations on the SQLite database which comes along with the Django installation.
Let's test our configurations by running the Django's built-in development server.
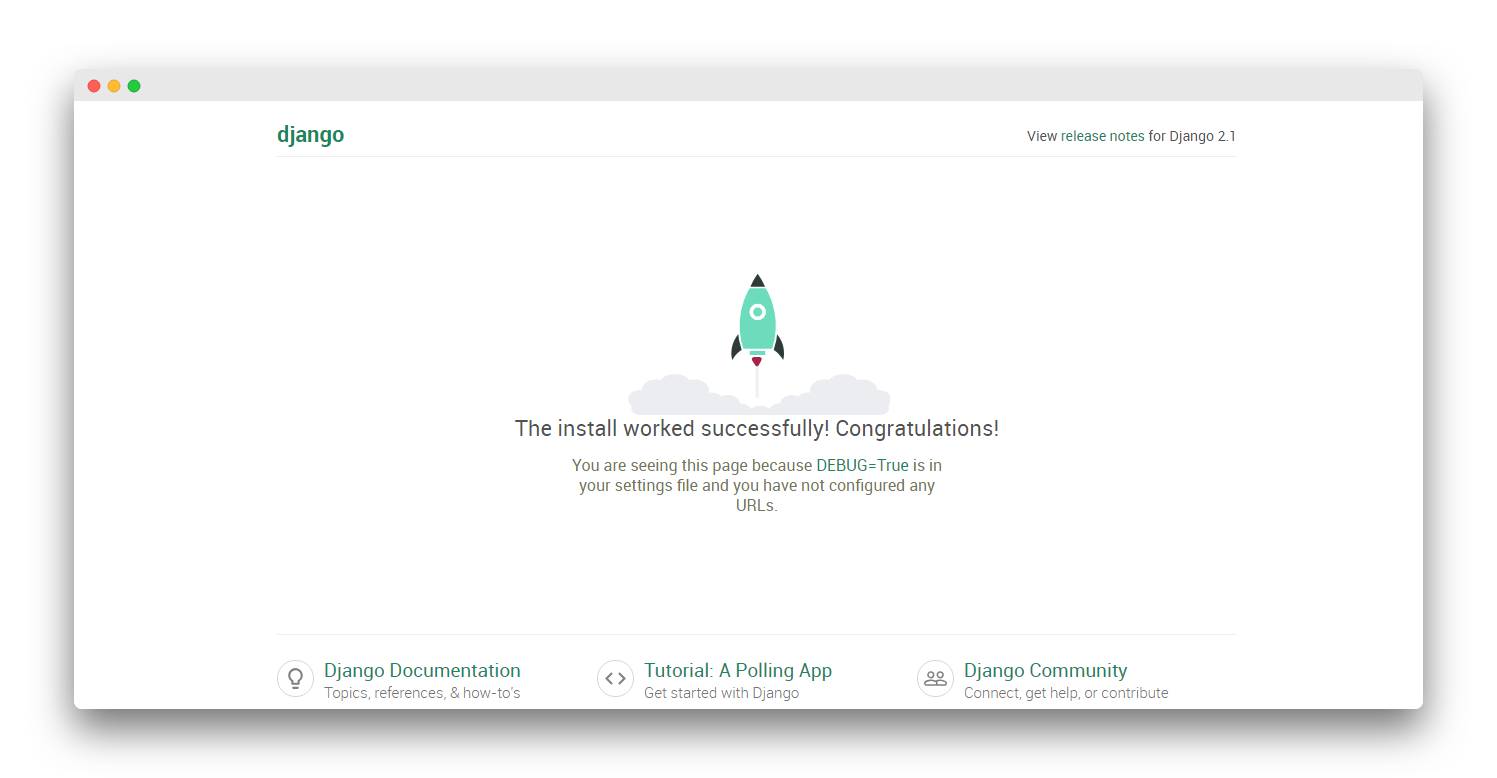
python manage.py runserverOpen your browser and go to this address http://127.0.0.1:8000/ if everything went well you should see this page.
Database Models
Now we will define the data models for our blog. A model is a Python class that subclasses django.db.models.Model, in which each attribute represents a database field. Using this subclass functionality, we automatically have access to everything within django.db.models.Models and can add additional fields and methods as desired. We will have a Post model in our database to store posts.
from django.db import models
from django.contrib.auth.models import User


STATUS = (
    (0,"Draft"),
    (1,"Publish")
)

class Post(models.Model):
    title = models.CharField(max_length=200, unique=True)
    slug = models.SlugField(max_length=200, unique=True)
    author = models.ForeignKey(User, on_delete= models.CASCADE,related_name='blog_posts')
    updated_on = models.DateTimeField(auto_now= True)
    content = models.TextField()
    created_on = models.DateTimeField(auto_now_add=True)
    status = models.IntegerField(choices=STATUS, default=0)

    class Meta:
        ordering = ['-created_on']

    def __str__(self):
        return self.title
At the top, we’re importing the class models and then creating a subclass of models.Model Like any typical blog, each blog post will have a title, slug, author name, and the timestamp or date when the article was published or last updated.
Notice how we declared a tuple for STATUS of a post to keep draft and published posts separated when we render them out with templates.
The Meta class inside the model contains metadata. We tell Django to sort results in the created_on field in descending order by default when we query the database. We specify descending order using the negative prefix. By doing so, posts published recently will appear first.
The __str__() method is the default human-readable representation of the object. Django will use it in many places, such as the administration site.
Now that our new database model is created we need to create a new migration record for it and migrate the change into our database.
(django) $ python manage.py makemigrations
(django) $ python manage.py migrate
Now we are done with the database.
Creating An Administration Site
We will create an admin panel to create and manage Posts. Fortunately, Django comes with an inbuilt admin interface for such tasks.
In order to use the Django admin first, we need to create a superuser by running the following command in the prompt.
python manage.py createsuperuserYou will be prompted to enter email, password, and username. Note that for security concerns Password won't be visible.
Username (leave blank to use 'user'): admin
Email address: [email protected]
Password:
Password (again):
Enter any details you can always change them later. After that rerun the development server and go to the address http://127.0.0.1:8000/admin/
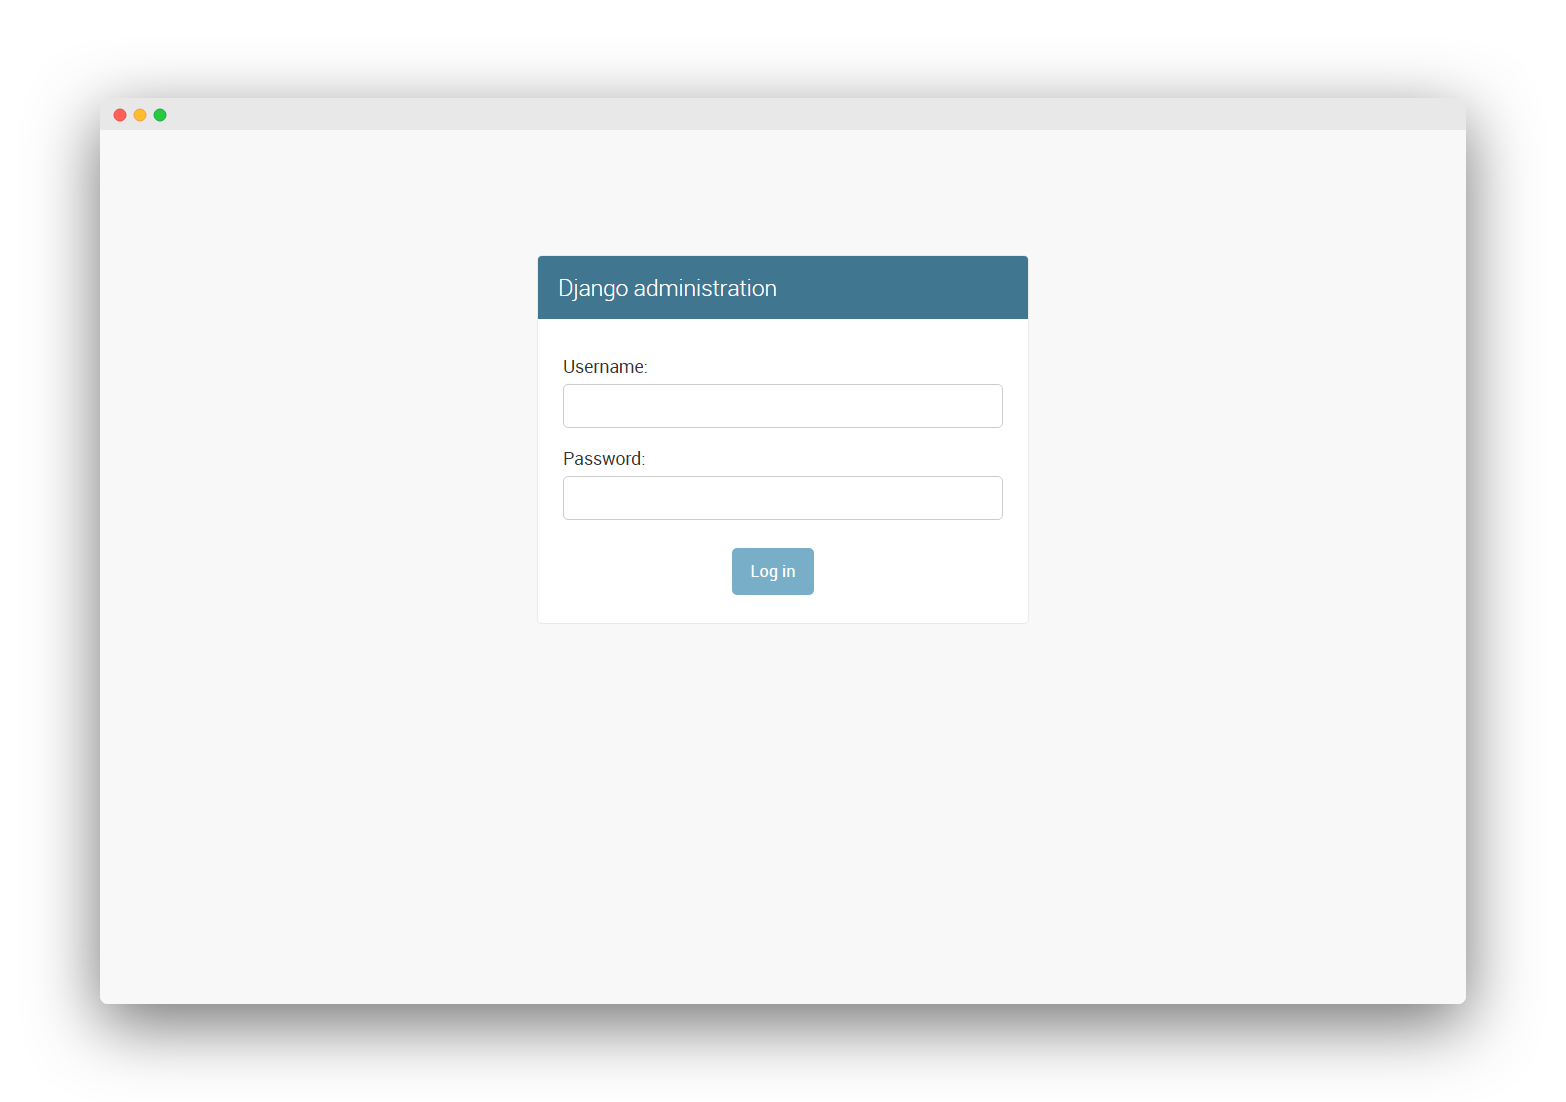
python manage.py runserverYou should see a login page, enter the details you provided for the superuser.
After you log in you should see a basic admin panel with Groups and Users models which come from Django authentication framework located in django.contrib.auth.
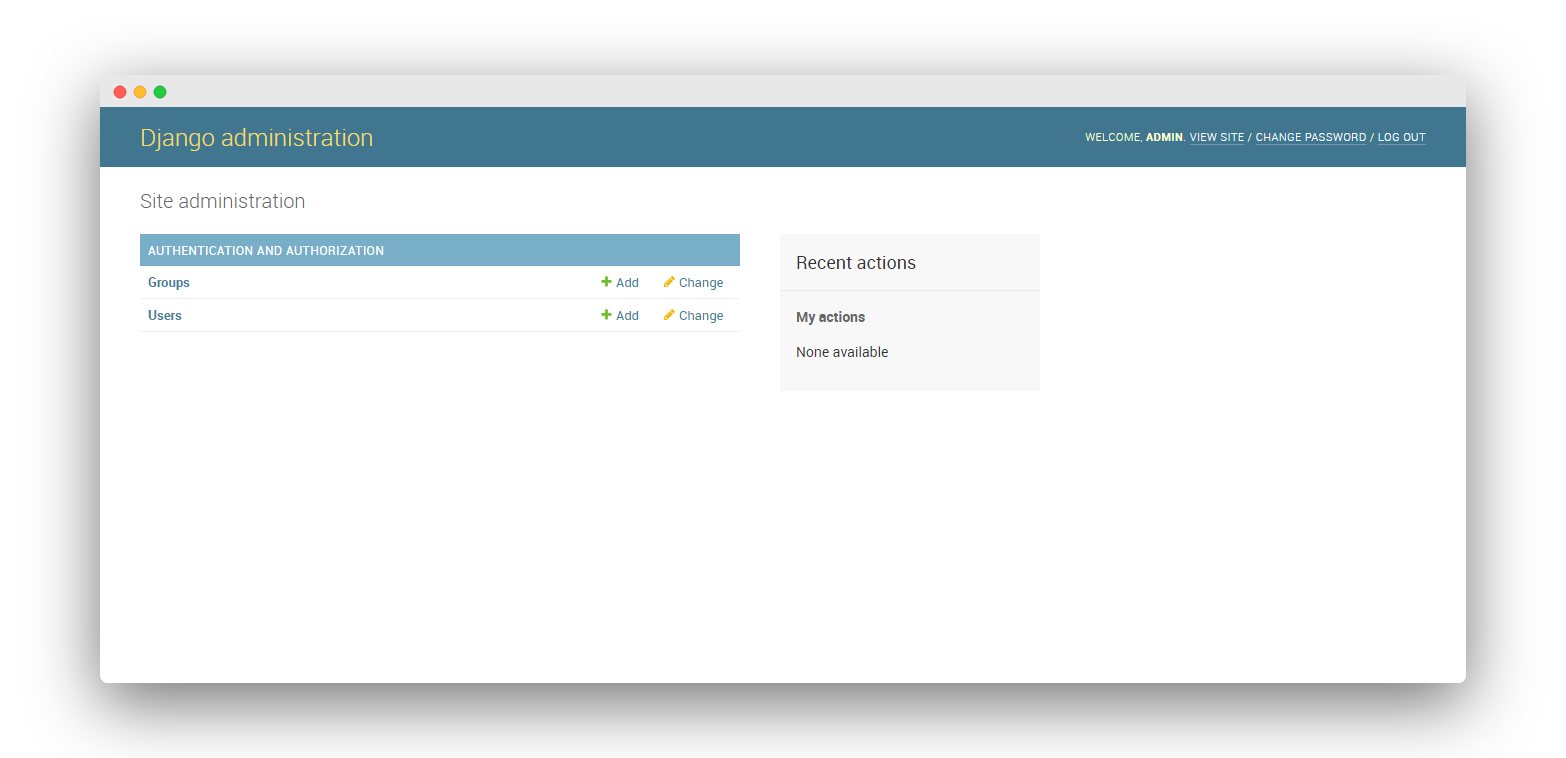
Still, we can't create posts from the panel we need to add the Post model to our admin.
Adding Models To The Administration Site
Open the blog/admin.py file and register the Post model there as follows.
from django.contrib import admin
from .models import Post

admin.site.register(Post)
Save the file and refresh the page you should see the Posts model there.
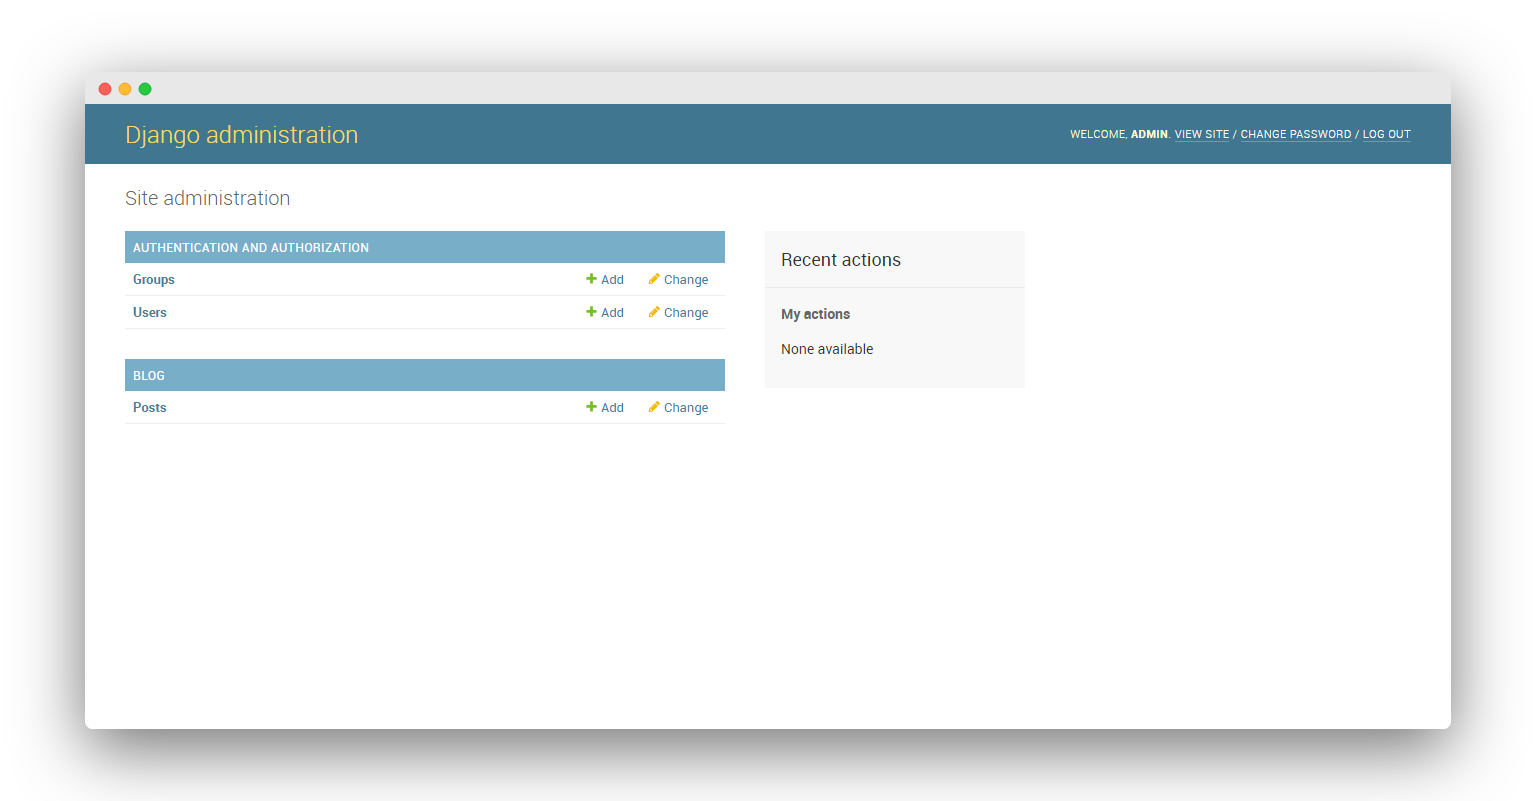
Now let's create our first blog post click on the Add icon beside Post which will take you to another page where you can create a post. Fill the respective forms and create your first ever post.
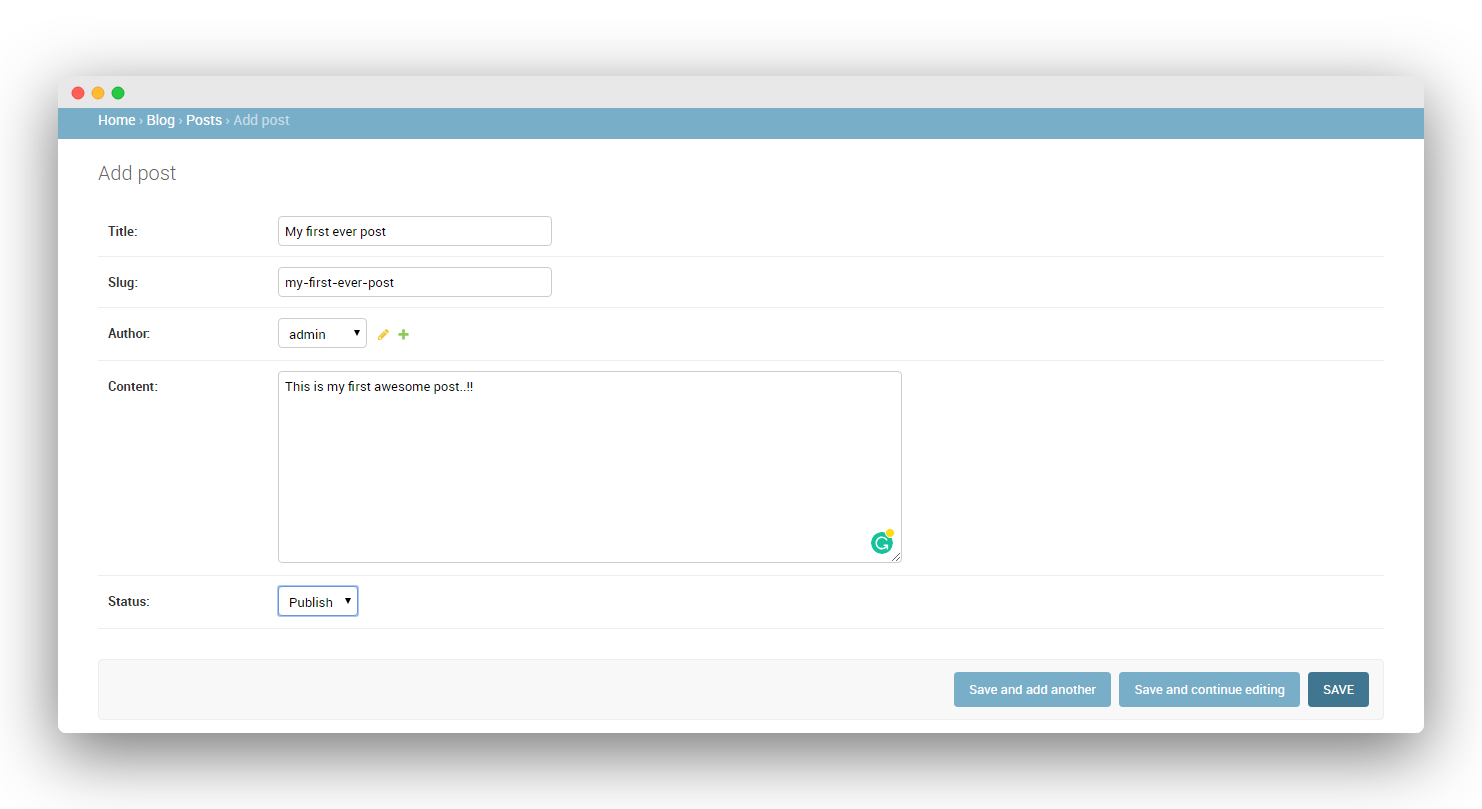
Once you are done with the Post save it now, you will be redirected to the post list page with a success message at the top.
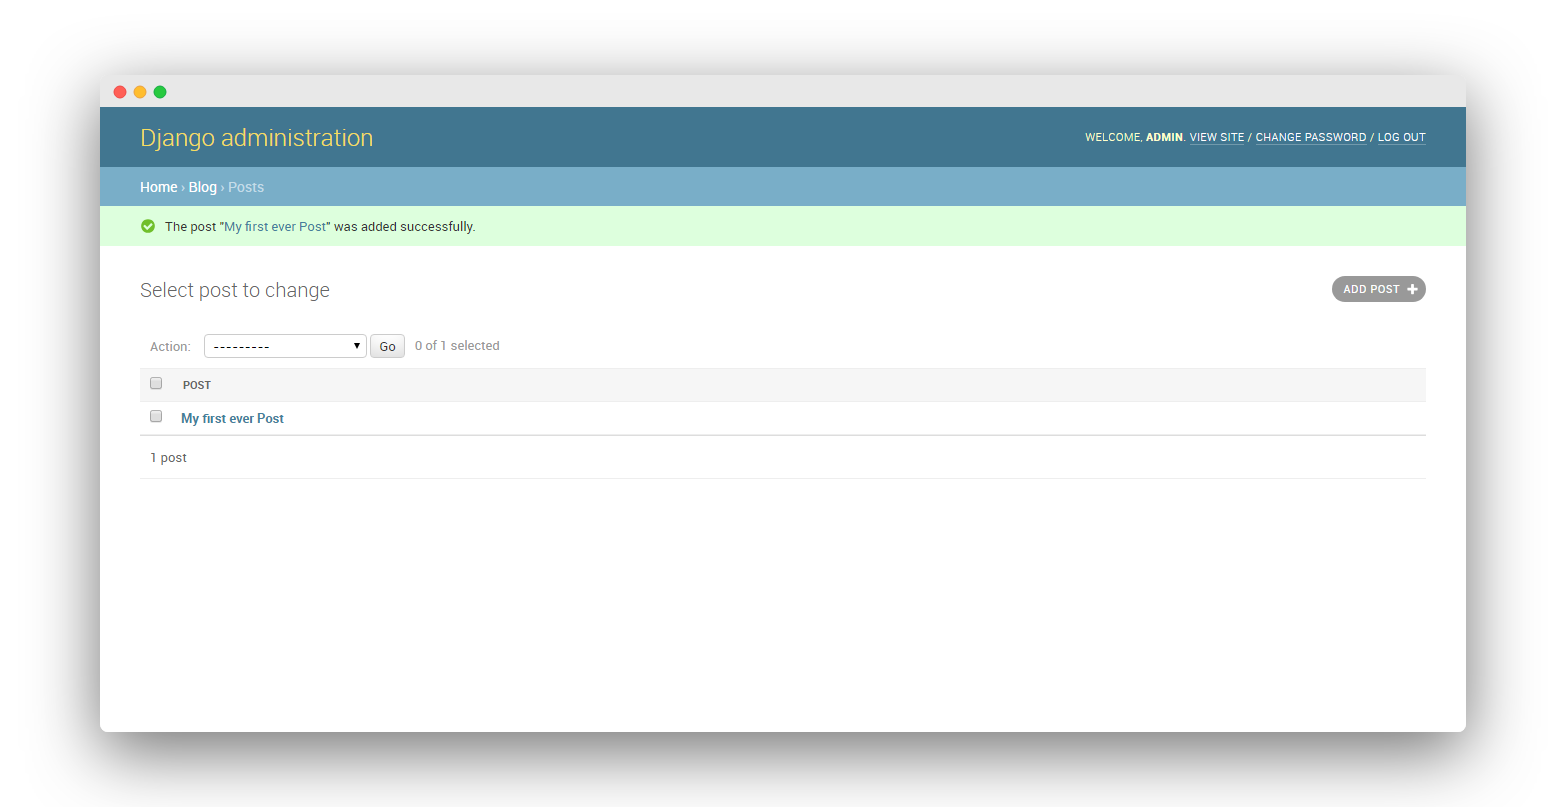
Though it does the work, we can customize the way data is displayed in the administration panel according to our convenience. Open the admin.py file again and replace it with the code below.
from django.contrib import admin
from .models import Post

class PostAdmin(admin.ModelAdmin):
    list_display = ('title', 'slug', 'status','created_on')
    list_filter = ("status",)
    search_fields = ['title', 'content']
    prepopulated_fields = {'slug': ('title',)}

admin.site.register(Post, PostAdmin)
This will make our admin dashboard more efficient. Now if you visit the post list, you will see more details about the Post.
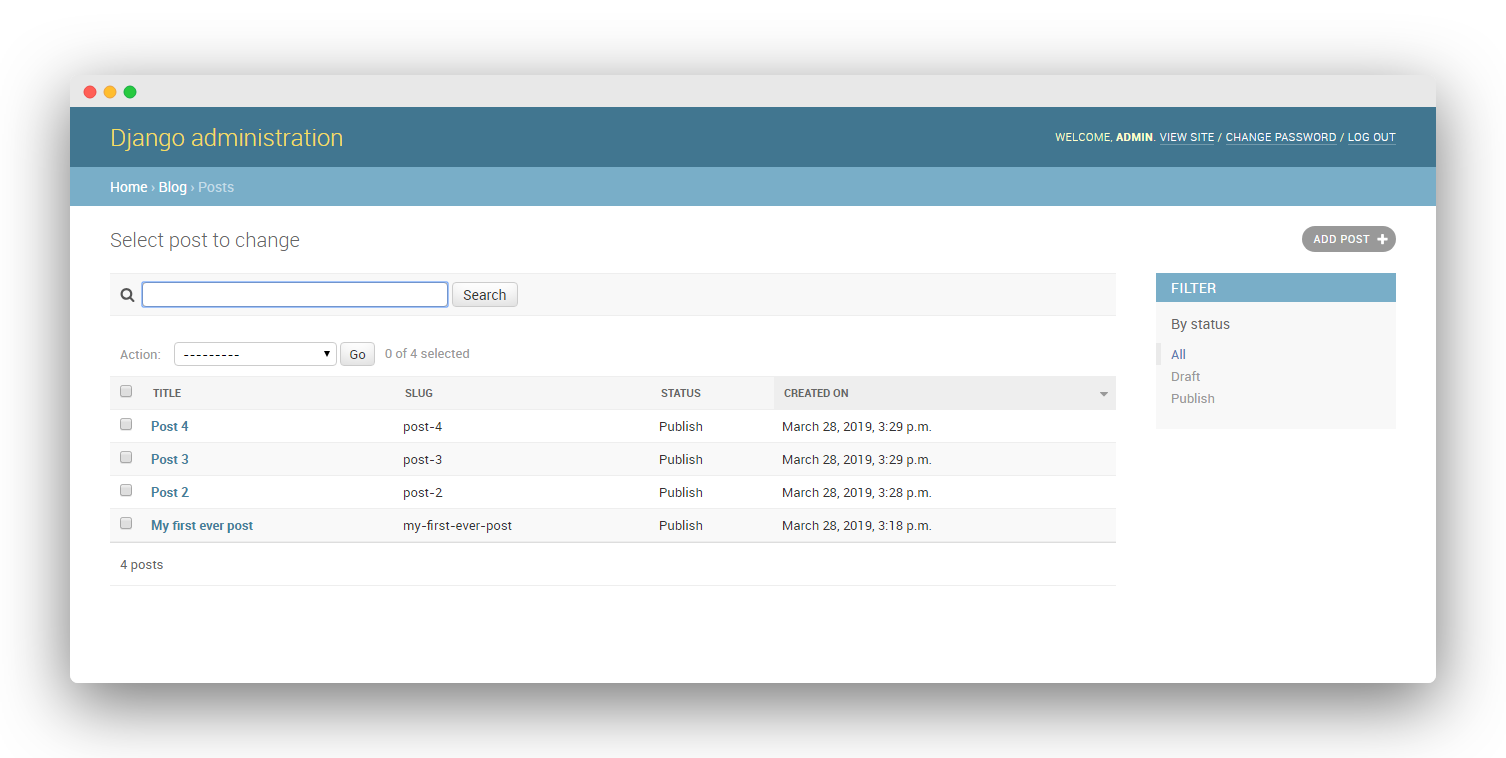
Note that I have added a few posts for testing.
The list_display attribute does what its name suggests display the properties mentioned in the tuple in the post list for each post.
If you notice at the right, there is a filter which is filtering the post depending on their Status this is done by the list_filter method.
And now we have a search bar at the top of the list, which will search the database from the search_fields attributes. The last attribute prepopulated_fields populates the slug, now if you create a post the slug will automatically be filled based upon your title.
Now that our database model is complete we need to create the necessary views, URLs, and templates so we can display the information on our web application.
Building Views
A Django view is just a Python function that receives a web request and returns a web response. We’re going to use class-based views then map URLs for each view and create an HTML templated for the data returned from the views.
Open the blog/views.py file and start coding.
from django.views import generic
from .models import Post

class PostList(generic.ListView):
    queryset = Post.objects.filter(status=1).order_by('-created_on')
    template_name = 'index.html'

class PostDetail(generic.DetailView):
    model = Post
    template_name = 'post_detail.html'
The built-in ListViews which is a subclass of generic class-based-views render a list with the objects of the specified model we just need to mention the template, similarly DetailView provides a detailed view for a given object of the model at the provided template.
Note that for PostList view we have applied a filter so that only the post with status published be shown at the front end of our blog. Also in the same query, we have arranged all the posts by their creation date. The ( - ) sign before the created_on signifies the latest post would be at the top and so on.
Adding URL patterns for Views
We need to map the URL for the views we made above. When a user makes a request for a page on your web app, the Django controller takes over to look for the corresponding view via the urls.py file, and then return the HTML response or a 404 not found error, if not found.
Create an urls.py file in your blog application directory and add the following code.
from . import views
from django.urls import path

urlpatterns = [
    path('', views.PostList.as_view(), name='home'),
    path('<slug:slug>/', views.PostDetail.as_view(), name='post_detail'),
]
We mapped general URL patterns for our views using the path function. The first pattern takes an empty string denoted by ' ' and returns the result generated from the PostList view which is essentially a list of posts for our homepage and at last we have an optional parameter name which is basically a name for the view which will later be used in the templates.
Names are an optional parameter, but it is a good practice to give unique and rememberable names to views which makes our work easy while designing templates and it helps keep things organized as your number of URLs grows.
Next, we have the generalized expression for the PostDetail views which resolve the slug (a string consisting of ASCII letters or numbers) Django uses angle brackets < > to capture the values from the URL and return the equivalent post detail page.
Now we need to include these blog URLs to the actual project for doing so open the mysite/urls.py file.
from django.contrib import admin

urlpatterns = [
    path('admin/', admin.site.urls),
]
Now first import the include function and then add the path to the new urls.py file in the URL patterns list.
from django.contrib import admin
from django.urls import path, include

urlpatterns = [
    path('admin/', admin.site.urls),
    path('', include('blog.urls')),
]
Now all the request will directly be handled by the blog app.
Creating Templates For The Views
We are done with the Models and Views now we need to make templates to render the result to our users. To use Django templates we need to configure the template setting first.
Now In settings.py scroll to the,TEMPLATES which should look like this.
TEMPLATES = [
    {
        'BACKEND': 'django.template.backends.django.DjangoTemplates',
        'DIRS': [],
        'APP_DIRS': True,
        'OPTIONS': {
            'context_processors': [
                'django.template.context_processors.debug',
                'django.template.context_processors.request',
                'django.contrib.auth.context_processors.auth',
                'django.contrib.messages.context_processors.messages',
            ],
        },
    },
]
Now add BASE_DIR / 'templates' in the DIRS so that django can find our templates.
TEMPLATES = [
{
'BACKEND': 'django.template.backends.django.DjangoTemplates',
# Add 'TEMPLATE_DIRS' here
'APP_DIRS': True,
'OPTIONS': {
'context_processors': [
'django.template.context_processors.debug',
'django.template.context_processors.request',
'django.contrib.auth.context_processors.auth',
'django.contrib.messages.context_processors.messages',
],
},
},
]Now save and close the file we are done with the configurations.
Django makes it possible to separate python and HTML, the python goes in views and HTML goes in templates. Django has a powerful template language that allows you to specify how data is displayed. It is based on template tags, template variables, and template filters.
I'll start off with a base.html file and a index.html file that inherits from it. Then later when we add templates for homepage and post detail pages, they too can inherit from base.html.
Let's start with the base.html file which will have common elements for the blog at any page like the navbar and footer. Also, we are using Bootstrap for the UI and Roboto font.
<!DOCTYPE html>
<html>
<head>
<title>Django Central</title>
<link href="https://fonts.googleapis.com/css?family=Roboto:400,700" rel="stylesheet">
<meta name="google" content="notranslate" />
<meta name="viewport" content="width=device-width, initial-scale=1" />
<link rel="stylesheet" href="https://maxcdn.bootstrapcdn.com/bootstrap/4.0.0/css/bootstrap.min.css" integrity="sha384-Gn5384xqQ1aoWXA+058RXPxPg6fy4IWvTNh0E263XmFcJlSAwiGgFAW/dAiS6JXm"
crossorigin="anonymous" />
</head>
<body>
<style>
body {
font-family: "Roboto", sans-serif;
font-size: 17px;
background-color: #fdfdfd;
}
.shadow {
box-shadow: 0 4px 2px -2px rgba(0, 0, 0, 0.1);
}
.btn-danger {
color: #fff;
background-color: #f00000;
border-color: #dc281e;
}
.masthead {
background: #3398E1;
height: auto;
padding-bottom: 15px;
box-shadow: 0 16px 48px #E3E7EB;
padding-top: 10px;
}
</style>
<!-- Navigation -->
<nav class="navbar navbar-expand-lg navbar-light bg-light shadow" id="mainNav">
<div class="container-fluid">
<a class="navbar-brand" href="{% url 'home' %}">Django central</a>
<button class="navbar-toggler navbar-toggler-right" type="button" data-toggle="collapse" data-target="#navbarResponsive"
aria-controls="navbarResponsive" aria-expanded="false" aria-label="Toggle navigation">
<span class="navbar-toggler-icon"></span>
</button>
<div class="collapse navbar-collapse" id="navbarResponsive">
<ul class="navbar-nav ml-auto">
<li class="nav-item text-black">
<a class="nav-link text-black font-weight-bold" href="#">About</a>
</li>
<li class="nav-item text-black">
<a class="nav-link text-black font-weight-bold" href="#">Policy</a>
</li>
<li class="nav-item text-black">
<a class="nav-link text-black font-weight-bold" href="#">Contact</a>
</li>
</ul>
</div>
</div>
</nav>
{% block content %}
<!-- Content Goes here -->
{% endblock content %}
<!-- Footer -->
<footer class="py-3 bg-grey">
<p class="m-0 text-dark text-center ">Copyright © Django Central</p>
</footer>
</body>
</html>
This is a regular HTML file except for the tags inside curly braces { } these are called template tags.
The {% url 'home' %} Returns an absolute path reference, it generates a link to the home view which is also the List view for posts.
The {% block content %} Defines a block that can be overridden by child templates, this is where the content from the other HTML file will get injected.
Next, we will make a small sidebar widget which will be inherited by all the pages across the site. Notice sidebar is also being injected in the base.html file this makes it globally available for pages inheriting the base file.
{% block sidebar %}

<style>
        .card{
            box-shadow: 0 16px 48px #E3E7EB;
        }

</style>

<!-- Sidebar Widgets Column -->
<div class="col-md-4 float-right ">
<div class="card my-4">
        <h5 class="card-header">About Us</h5>
    <div class="card-body">
        <p class="card-text"> This awesome blog is made on the top of our Favourite full stack Framework 'Django', follow up the tutorial to learn how we made it..!</p>
        <a href="https://djangocentral.com/building-a-blog-application-with-django"
           class="btn btn-danger">Know more!</a>
    </div>
</div>
</div>

{% endblock sidebar %}
Next, create the index.html file of our blog that's the homepage.
{% extends "base.html" %}
{% block content %}
<style>
body {
font-family: "Roboto", sans-serif;
font-size: 18px;
background-color: #fdfdfd;
}
.head_text {
color: white;
}
.card {
box-shadow: 0 16px 48px #E3E7EB;
}
</style>
<header class="masthead">
<div class="overlay"></div>
<div class="container">
<div class="row">
<div class=" col-md-8 col-md-10 mx-auto">
<div class="site-heading">
<h3 class=" site-heading my-4 mt-3 text-white"> Welcome to my awesome Blog </h3>
<p class="text-light">We Love Django As much as you do..!  
</p>
</div>
</div>
</div>
</div>
</header>
<div class="container">
<div class="row">
<!-- Blog Entries Column -->
<div class="col-md-8 mt-3 left">
{% for post in post_list %}
<div class="card mb-4">
<div class="card-body">
<h2 class="card-title">{{ post.title }}</h2>
<p class="card-text text-muted h6">{{ post.author }} | {{ post.created_on}} </p>
<p class="card-text">{{post.content|slice:":200" }}</p>
<a href="{% url 'post_detail' post.slug %}" class="btn btn-primary">Read More →</a>
</div>
</div>
{% endfor %}
</div>
{% block sidebar %} {% include 'sidebar.html' %} {% endblock sidebar %}
</div>
</div>
{%endblock%}With the {% extends %} template tag, we tell Django to inherit from the base.html template. Then, we are filling the content blocks of the base template with content.
Notice we are using for loop in HTML that's the power of Django templates it makes HTML Dynamic. The loop is iterating through the posts and displaying their title, date, author, and body, including a link in the title to the canonical URL of the post.
In the body of the post, we are also using template filters to limit the words on the excerpts to 200 characters. Template filters allow you to modify variables for display and look like {{ variable | filter }}.
Now run the server and visit http://127.0.0.1:8000/ you will see the homepage of our blog.
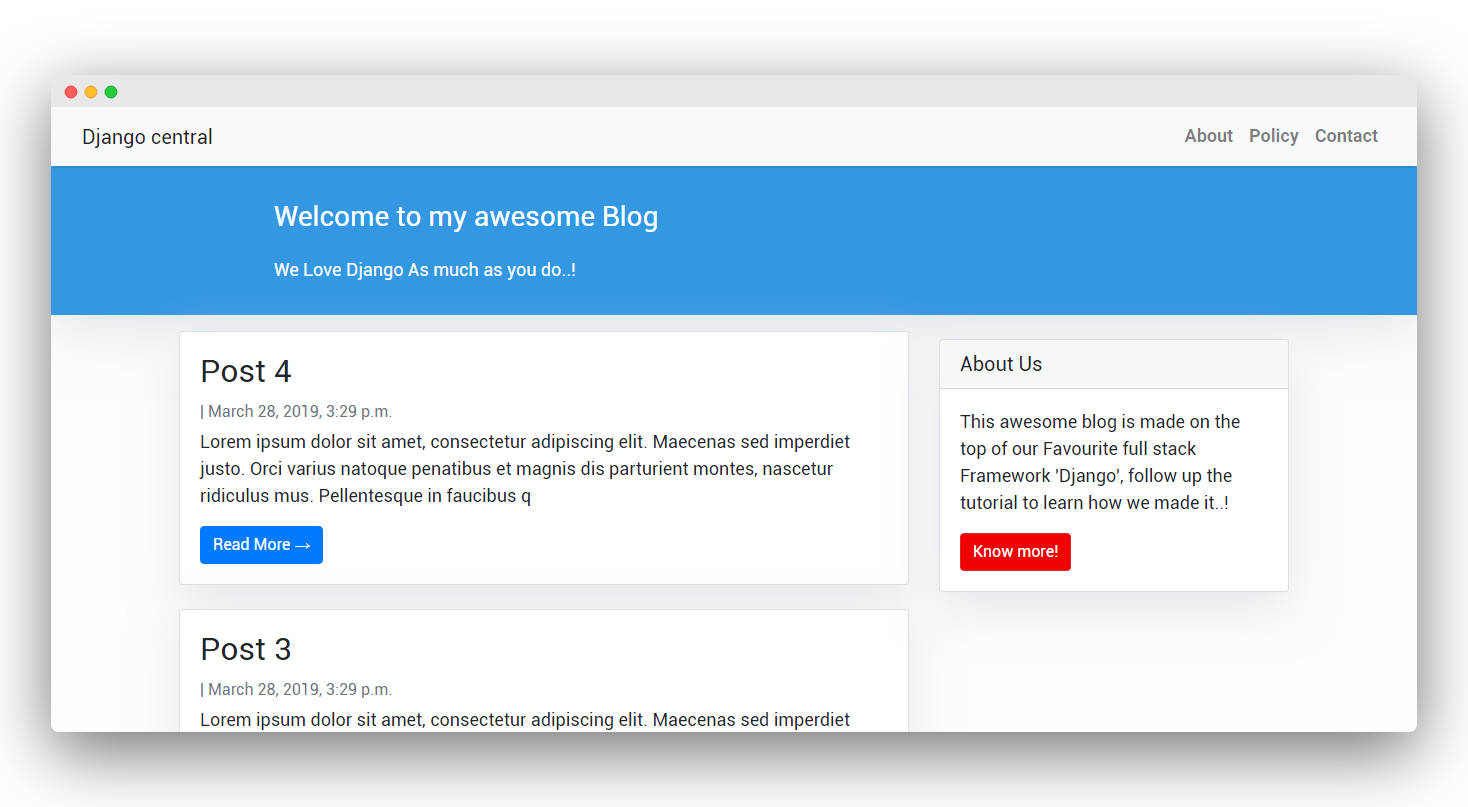
Looks good..!
You might have noticed I have imported some dummy content to fill the page you can do the same using this lorem ipsum generator tools.
Now let's make an HTML template for the detailed view of our posts.
Next, Create a file post_detail.html and paste the below HTML there.
{% extends 'base.html' %} {% block content %}

<div class="container">
  <div class="row">
    <div class="col-md-8 card mb-4  mt-3 left  top">
      <div class="card-body">
        <h1>{% block title %} {{ object.title }} {% endblock title %}</h1>
        <p class=" text-muted">{{ post.author }} | {{ post.created_on }}</p>
        <p class="card-text ">{{ object.content | safe }}</p>
      </div>
    </div>
    {% block sidebar %} {% include 'sidebar.html' %} {% endblock sidebar %}
  </div>
</div>

{% endblock content %}
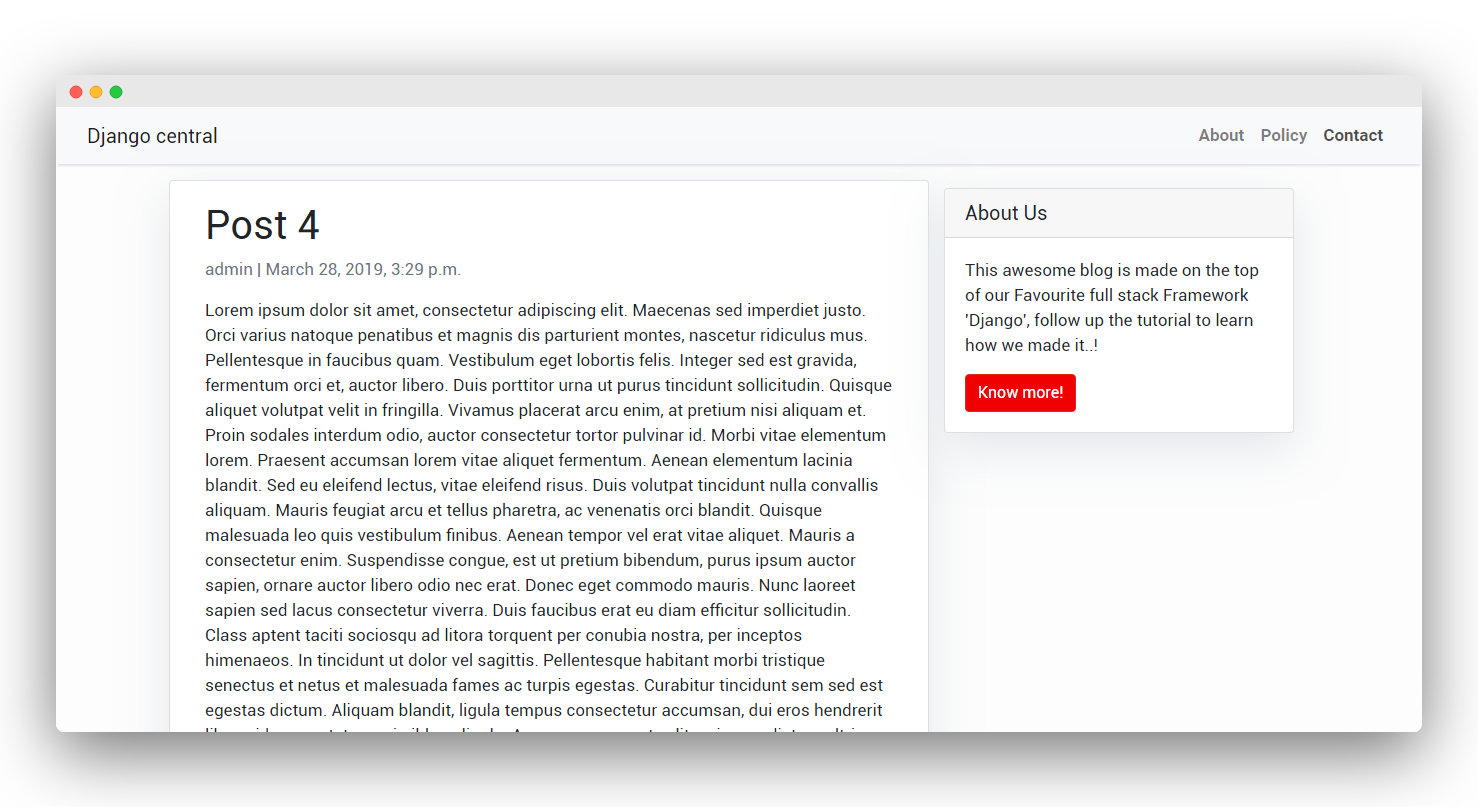
At the top, we specify that this template inherits from.base.html Then display the body from our context object, which DetailView makes accessible as an object.
Now visit the homepage and click on read more, it should redirect you to the post detail page.
Extending The Application
Adding Comments System - https://djangocentral.com/creating-comments-system-with-django/
Adding Pagination to the Index page - https://djangocentral.com/adding-pagination-with-django/
Integrating PostgreSQL with Django - https://djangocentral.com/using-postgresql-with-django/
Configuring static assets - https://djangocentral.com/static-assets-in-django/
Integrating Summernote WYSIWYG Editor - Integrating Summernote WYSIWYG Editor in Django
Creating Sitemap - https://djangocentral.com/creating-sitemaps-in-django/
Creating Feeds - https://djangocentral.com/creating-feeds-with-django/
Uploading Images - How To Upload Images With Django
Using Celery for Asynchronous and Periodic Tasks - How to Use Celery with Django for Asynchronous and Periodic Tasks : A Comprehensive Guide
Authentication using an Email Address - Django Authentication using an Email Address
Deploy Django Application - How To Deploy Django App with Nginx, Gunicorn, PostgreSQL and Let's Encrypt SSL on Ubuntu
We finally switched from wordpress to Django - https://djangocentral.com/switched-from-wordpress-to-django/
Wrapping It Up
We have come to the end of this tutorial. Thank you for reading this far. This post is just the tip of the iceberg considering the number of things you could do with Django.
We have built a basic blog application from scratch! Using the Django admin we can create, edit, or delete the content and we used Django's class-based views, and at the end, we made beautiful templates to render it out.
If you are stuck at any step, refer to this GitHub repo
This blogging app should be enough to get you started with Django.