Django is a high-level full-stack open-source web framework written in Python, that encourages rapid development and clean, pragmatic design. Django is the go-to framework for any project irrespective of size, from a basic blog to a full-fledged social media app.
Out of the box, Django comes with a built-in development server that is used locally. However, it isn't suitable for the production environment because it's single-threaded and lacks security measures.
In this article, we will learn how to deploy a Django application with Nginx, Gunicorn, PostgreSQL, and Let's Encrypt SSL on an Ubuntu server.
Production Stack Architecture
A modern Django application's production stack is built with the following components.
- OS - Ubuntu
- WSGI Server - Gunicorn
- Web Server - Nginx
- Database - PostgreSQL
The following diagram illustrates how Django works in the production environment.
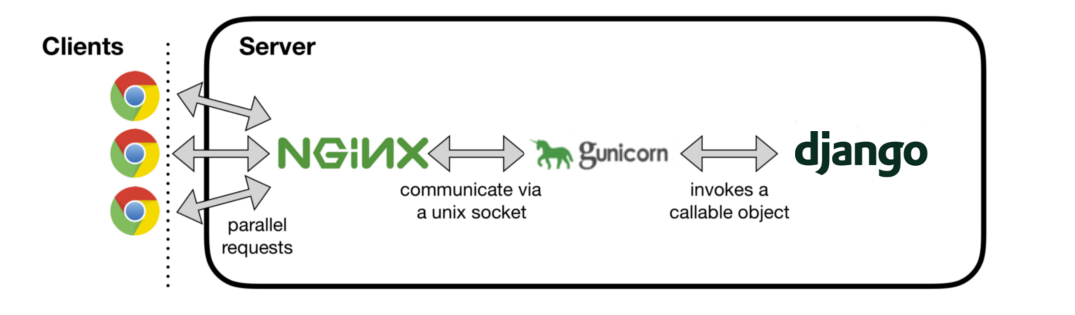
The following will happen when the client browser launches an HTTP request
- NGINX receives the HTTP request.
- If a static file is requested, NGINX serves the static file directly. If a dynamic page is requested, NGINX delegates the request to Gunicorn through a UNIX socket.
- Gunicorn passes the request to Django for processing. The resulting HTTP response is passed back to NGINX, which in turn passes it back to the client browser.
Prerequisites
To follow this tutorial, you will need:
- Domain
- Hosting
To deploy an application you must have an active hosting subscription and a domain.
There are plenty of great hosting providers who offer good services for relatively low prices. One of them is hetzner which I personally use because of its reliable and affordable servers.
If you signup at hetzner using this link, you will receive €20 worth of free credits -Take me to hetzner and credit €20 in my account
Setting up PostgreSQL
Login to your remote server using SSH or putty and install these packages.
sudo apt-get install postgresql postgresql-contrib libpq-dev python3-devOnce it's done login to Postgres.
sudo -u postgres psqlNow the terminal should be prefixed with postgres=# , The above command gets you the psql command-line interface in full admin mode let's create a database and database user as follows.
Variables:
database_name- Name of the database.database_user- Database user's namesome_password- Database user's password
CREATE DATABASE database_name;
CREATE USER database_user WITH ENCRYPTED PASSWORD 'some_password';
ALTER ROLE database_user SET client_encoding TO 'utf8';
ALTER ROLE database_user SET default_transaction_isolation TO 'read committed';
ALTER ROLE database_user SET timezone TO 'UTC';
GRANT ALL PRIVILEGES ON DATABASE database_name TO database_user;
\q
Here we are creating a database called database_name and the user database_user with administrative access to the database.
You might also need to update the database settings in the Django project. Also, add psycopg2in the requirements file, so that python can communicate with the database.
In case you are having trouble with PostgreSQL setup kindly refer to the following article - Using PostgreSQL with Django
Also, don't keep any kind of sensitive data for authentication such as database credentials, API keys hardcoded in the codebase these keys should be loaded from environmental variables.
Creating a Virtual Environment
First, we need to Install the python3-venv package which consists the venv module.
sudo apt install python3-venvNext, create a directory for the project and navigate into it.
Variables:
dir_name- Name of the directoryvenv_name- Name of the virtual environment.
mkdir dir_namecd dir_name
Now we can create and activate the virtual environment.
python3 -m venv venv_namesource venv_name/bin/activate
If everything went right, you should see your terminal prefixed by the Environment name.
In case you are having trouble setting up virtual environments refer to the following article - How To Create Python Virtual Environments On Ubuntu
Settings up the project
You can either create a new project Django project or you can pull an existing project from git.
git clone git_urlNow set up the project and install all the required python packages along with gunicorn and psycopg2-binary
pip install gunicorn psycopg2-binaryYou may have to make some changes in settings.py file to make it deployment-ready also don't forget to add your PostgreSQL configuration there.
Luckily Django comes with a utility to run checks for a production-ready application run the following command in your terminal.
python manage.py check --deployYou will see an output with no errors but several warnings. This means the check was successful, but you should go through the warnings to see if there is anything more you can do to make your project safe for production.
Now let's run the migrations.
python manage.py makemigrationspython manage.py migrate
We can test the app by running the local development server but first, we need to create an exception at port 8000.
sudo ufw allow 8000python manage.py runserver 0.0.0.0:8000
In your web browser navigate to http://server_domain_or_IP:8000 and you should see the app.
Setting up Gunicorn Server
Django's primary deployment platform is WSGI. WSGI stands for Web Server Gateway Interface and it is the standard for serving Python applications on the web.
When you generate a new project using the start project command, Django creates a wsgi.py file inside your project directory. This file contains a WSGI application callable, which is an access point to your application. WSGI is used for both running your project with the Django development server, and deploying your application with the server of your choice in a production environment.
You can test if Gunicorn is able to serve the project as follows.
gunicorn --bind 0.0.0.0:8000 project_name.wsgiGo back to http://server_domain_or_IP:8000 you should see the application running but without static assets such as CSS and images.
Once you finishing testing the app press ctrl + c to stop the process and deactivate the virtual environment.
deactivateNow we will build a robust mechanism for Gunicorn so that it can communicate with the Django Application.
Gunicorn uses its .sock files to talks to other parts of the process. Sock files are Unix domain sockets that processes use to communicate. I personally prefer keeping the sock file in /var/log/gunicorn so it can be easily accessible by Nginx. Therefore we need to make a directory there.
mkdir /var/log/gunicornWith that now create and open a systemd service file for Gunicorn with sudo privileges and add the below configuration.
sudo nano /etc/systemd/system/gunicorn.service[Unit]
Description=gunicorn daemon
After=network.target
[Service]
User=unix_user_name
Group=www-data
WorkingDirectory=/path/to/the/project/directory
ExecStart=/path/to/virtual-env/bin/gunicorn --access-logfile - --workers 3 --bind unix:/var/log/gunicorn/project_name.sock project_name.wsgi:application
[Install]
WantedBy=multi-user.targetVariables:
unix_user_name- By default it'srootproject_name- Name of the project- Number of workers - 3 in this example
The [Unit] section is for specifying meta description of the service and tell the init system to only start this service after the networking target has been reached.
In the [Service] section we have specified the User and group where the Gunicorn process will run, here we have to provide the working directory and full path of Gunicorn executable from the virtual environment.
Finally, the [Install] section informs the system to start the service when the regular multi-user system is up.
Now save the file and run the following commands to enable it on boot.
sudo systemctl start gunicornsudo systemctl enable gunicorn
Verify Gunicorn Setup
Setting up Gunicorn service can be error-prone hence it's really important to verify it before moving forward.
sudo systemctl status gunicornIf you get an output like following that means everything went right and Gunicorn service is up and running.
● gunicorn.service - gunicorn daemon
   Loaded: loaded (/etc/systemd/system/gunicorn.service; enabled; vendor preset: enabled)
   Active: active (running) since Sat 2020-04-25 13:31:07 UTC; 2h 5min ago
 Main PID: 19668 (gunicorn)
If the output indicates an error has occurred you must have misconfigured something so check the logs to find it out. To see the Gunicorn logs run the following command.
sudo journalctl -u gunicornIn case you had to make changes in the service file reload the daemon to reread the new service definition and restart the Gunicorn process by these commands.
sudo systemctl daemon-reload
sudo systemctl restart gunicorn
Setting up Nginx
NGINX is a web server focused on high concurrency, performance, and low memory usage. NGINX also acts as a reverse proxy, receiving HTTP requests, and routing them to different backends.
When you are serving a website, you have to serve dynamic content, but you also need to serve static files, such as CSS, JavaScript files, and images. While Gunicorn is capable of serving static files, it adds unnecessary overhead to HTTP requests and therefore, it is encouraged to set up a web server, such as NGINX in front of it.
So let's start with Installing Nginx.
sudo apt-get install nginxSince Nginx is going to serve our static assets it's recommended to set the STATIC_ROOT to /var/www/static/ so that it can be easily accessible to Nginx.
So in your project's settings.py modify the STATIC_ROOTas shown below.
STATIC_ROOT = '/var/www/static'We need to export static assets with Django. The collectstatic command copies static files from all applications and stores them in the STATIC_ROOT directory. Open the shell and run the following command.
python manage.py collectstaticNext, create and open a new server block in Nginx's sites-available directory.
Variable:
project_name- Name of the project or domain.
sudo nano /etc/nginx/sites-available/project_nameNow add the following block in the file.
Variables:
server_domain_or_IP-Type domain name or server IP.static_root_path: Path defined in yoursettings.py/path/to/staticfiles: If you are following the guide then it should be/var/www
server {
    listen 80;
    server_name server_domain_or_IP;

    location = /favicon.ico { access_log off; log_not_found off; }
    location  /static/ {
        root /path/to/staticfiles;
    }

    location / {
        include proxy_params;
        proxy_pass http://unix:/var/log/gunicorn/project_name.sock;
    }
}
Save and close the file when you are finished. Now, we can enable the file by linking it to the sites-enabled directory.
sudo ln -s /etc/nginx/sites-available/project_name /etc/nginx/sites-enabledVariable:
project_name: The same name given while creating the Nginx server block.
Test your Nginx configuration for syntax errors by the following command.
sudo nginx -tIf the test was was successful go forward and restart the Nginx server so that changes can take place.
sudo systemctl restart nginxFinally, we need to open up our firewall to normal traffic on port 80. Since we no longer need access to the development server, we can remove the rule to open port 8000 as well.
sudo ufw delete allow 8000
sudo ufw allow 'Nginx Full'
Now in your browser navigate to http://domain_name_or_server_IPthe application should be running here.
Troubleshooting Nginx
In case you don't see your application running that means there must be some misconfiguration in the server block so go through the Nginx logs and solve the issue.
Run the following command to access Nginx logs.
sudo tail -F /var/log/nginx/error.logSecuring the application with SSL
Let's Encrypt is a free Certificate Authority (CA) that issues SSL certificates. You can use these SSL certificates to secure traffic on your Django application. Lets Encrypt has an automated installer called Certbot with Certbot you can very easily add a certificate to your site in just a couple of minutes
First, install Certbot's Nginx package.
sudo apt-get update
sudo apt-get install python3-certbot-nginx
Configuring Nginx for Certbot
Certbot can automatically configure SSL for Nginx, but it needs to be able to find the correct server block in your config. It does this by looking for a server_name directive that matches the domain you're requesting a certificate for so make sure you have set the correct domain in the /etc/nginx/sites-available/project_namefile.
. . .
server_name example.com www.example.com;
. . .
In case you made changes to this server block reload Nginx.
sudo systemctl reload nginxNext, we need to configure ufw firewall to allow HTTPS traffic.
So first enable ufw firewall if it's not already.
sudo ufw allow sshsudo ufw enable
Enter y for confirmation next add following rules to the firewall.
sudo ufw allow 'Nginx Full'sudo ufw delete allow 'Nginx HTTP'
Now you check the updated rules with the following command.
sudo ufw statusThis should be the output.
Status: active

To                         Action      From
--                         ------      ----
Nginx Full                 ALLOW       Anywhere
22/tcp                     ALLOW       Anywhere
Nginx Full (v6)            ALLOW       Anywhere (v6)
22/tcp (v6)                ALLOW       Anywhere (v6)
Now we can obtain the SSL certificate with the following command.
sudo certbot --nginx -d example.com -d www.example.comThis runs certbot with the --nginx plugin, using -d to specify the domain names you would like the certificate to be valid for.
You will be asked a series of questions for the setup.
Plugins selected: Authenticator nginx, Installer nginx
Enter email address (used for urgent renewal and security notices) (Enter 'c' to
cancel): [email protected]

- - - - - - - - - - - - - - - - - - - - - - - - - - - - - - - - - - - - - - - -
Please read the Terms of Service at
https://letsencrypt.org/documents/LE-SA-v1.2-November-15-2017.pdf. You must
agree in order to register with the ACME server at
https://acme-v02.api.letsencrypt.org/directory
- - - - - - - - - - - - - - - - - - - - - - - - - - - - - - - - - - - - - - - -
(A)gree/(C)ancel: A

- - - - - - - - - - - - - - - - - - - - - - - - - - - - - - - - - - - - - - - -
Would you be willing to share your email address with the Electronic Frontier
Foundation, a founding partner of the Let's Encrypt project and the non-profit
organization that develops Certbot? We'd like to send you email about our work
encrypting the web, EFF news, campaigns, and ways to support digital freedom.
- - - - - - - - - - - - - - - - - - - - - - - - - - - - - - - - - - - - - - - -
(Y)es/(N)o: Y

Obtaining a new certificate
Performing the following challenges:
http-01 challenge for test.djangocentral.com
Waiting for verification...
Cleaning up challenges
Deploying Certificate to VirtualHost /etc/nginx/sites-enabled/default

Please choose whether or not to redirect HTTP traffic to HTTPS, removing HTTP access.
- - - - - - - - - - - - - - - - - - - - - - - - - - - - - - - - - - - - - - - -
1: No redirect - Make no further changes to the webserver configuration.
2: Redirect - Make all requests redirect to secure HTTPS access. Choose this for
new sites, or if you're confident your site works on HTTPS. You can undo this
change by editing your web server's configuration.
- - - - - - - - - - - - - - - - - - - - - - - - - - - - - - - - - - - - - - - -
Select the appropriate number [1-2] then [enter] (press 'c' to cancel): 2
Redirecting all traffic on port 80 to ssl in /etc/nginx/sites-enabled/default
Once the setup is done these configurations will be updated, and Nginx will reload to pick up the new settings certbot will wrap up with a message telling you the process was successful and where your certificates are stored.
- - - - - - - - - - - - - - - - - - - - - - - - - - - - - - - - - - - - - - - -
Congratulations! You have successfully enabled https://test.djangocentral.com

You should test your configuration at:
https://www.ssllabs.com/ssltest/analyze.html?d=test.djangocentral.com
- - - - - - - - - - - - - - - - - - - - - - - - - - - - - - - - - - - - - - - -

IMPORTANT NOTES:
 - Congratulations! Your certificate and chain have been saved at:
   /etc/letsencrypt/live/test.djangocentral.com/fullchain.pem
   Your key file has been saved at:
   /etc/letsencrypt/live/test.djangocentral.com/privkey.pem
   Your cert will expire on 2020-07-25. To obtain a new or tweaked
   version of this certificate in the future, simply run certbot again
   with the "certonly" option. To non-interactively renew *all* of
   your certificates, run "certbot renew"
 - If you like Certbot, please consider supporting our work by:

   Donating to ISRG / Let's Encrypt:   https://letsencrypt.org/donate
   Donating to EFF:                    https://eff.org/donate-le
That's it, open your browser and navigate to the domain and you will see a secure SSL connection on you Django application.
Renewing SSL certificates
The let's encrypt certificates are valid up to 90 days only after that you have to renew the certificates. The Certbot package comes with a script to renew existing certificates. You can test the renewal script with a single dry run like below.
sudo certbot renew --dry-runIf you see no errors, you’re all set. When necessary, Certbot will renew your certificates and reload Nginx to pick up the changes. If the automated renewal process ever fails, Let’s Encrypt will send a message to the email you specified, warning you when your certificate is about to expire.